
Dusty Pink Floral Baby Bonnet Crochet Pattern
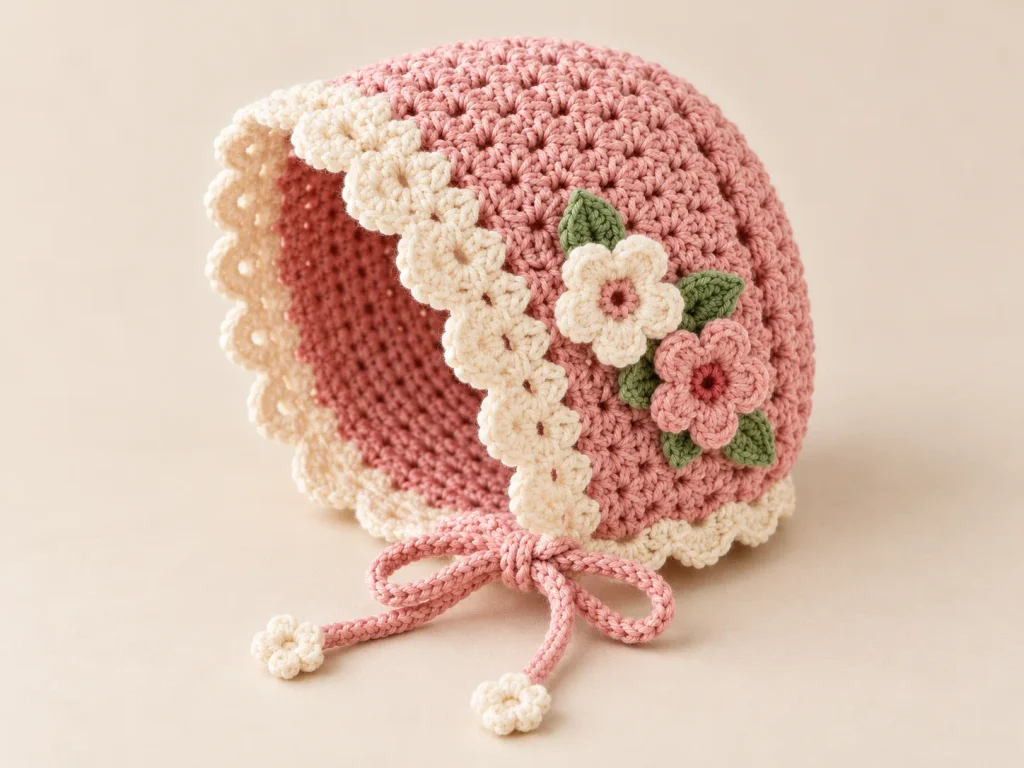
There is something so lovely about a handmade baby bonnet, especially when it has that soft vintage look.
This Dusty Pink Floral Baby Bonnet combines a textured pink body with cream scalloped edging, little crochet flowers, sage green leaves, and delicate ties finished with tiny flower tips.
The construction is simple to understand once you see how the pieces come together. The bonnet starts as one flat rectangle, which is folded and seamed at the back. After that, the cream face edging, lower scallops, flowers, leaves, and ties are added separately.
This version is designed for approximately 0–3 months, with a head circumference reference of 36–40 cm / 14.2–15.7 in. The finished bonnet measures about 14 cm / 5.5 in high and approximately 14.5 cm / 5.7 in from back to front, including the cream edging. Estimated working time is around 4–6 hours.
Make It in Your Favorite Colors
The dusty pink, cream, and sage combination gives the bonnet a soft, romantic look, but you can absolutely change the colors.
A pale blue body with ivory edging would be beautiful. So would lavender with cream, soft beige with white, or even a sage-green bonnet with tiny ivory flowers.
If you change the yarn, keep the same yarn weight and make sure your gauge stays close to the pattern so the bonnet still fits the intended size.
Quick Pattern Details
| Detail | Information |
|---|---|
| Pattern | Dusty Pink Floral Baby Bonnet |
| Skill Level | Beginner–Intermediate |
| Size | 0–3 months |
| Head Reference | 36–40 cm / 14.2–15.7 in |
| Bonnet Height | Approx. 14 cm / 5.5 in |
| Back-to-Front Depth | Approx. 14.5 cm / 5.7 in |
| Estimated Time | 4–6 hours |
| Main Hook | 3.5 mm |
| Appliqué Hook | 3 mm |
| Terminology | US crochet terms |
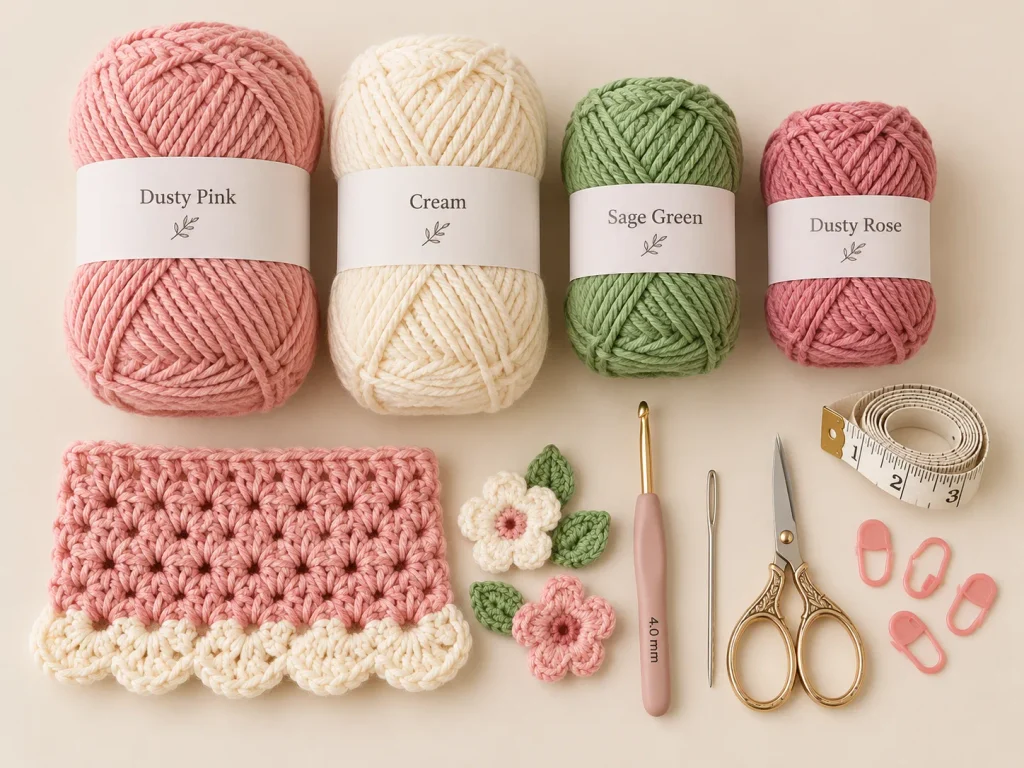
Materials
- DK / light weight 3 cotton or cotton-acrylic yarn
- Dusty pink: approx. 40 g / 100 m
- Cream: approx. 20 g / 50 m
- Sage green: approx. 5 g / 12.5 m
- 3.5 mm crochet hook
- 3 mm crochet hook
- Yarn needle
- Scissors
- Measuring tape
- Removable stitch marker
- Pins for positioning the flowers and leaves
This bonnet uses crocheted ties only, with no buttons, beads, or elastic.
Gauge
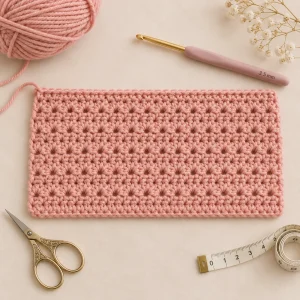
Using the main hook:
20 stitches and 16 textured rows = 10 × 10 cm / 4 × 4 in
Measure the fabric without stretching it.
If your swatch is too small, go up a hook size. If it is too large, go down a hook size.
The bonnet body should finish at approximately 27.5 × 13 cm before it is folded and assembled.
Abbreviations
- MR – Magic ring
- ch – Chain
- sc – Single crochet
- hdc – Half double crochet
- dc – Double crochet
- sl st – Slip stitch
- st(s) – Stitch(es)
- RS / WS – Right side / wrong side
- FO – Fasten off
- Shell – Group of dc worked into one stitch
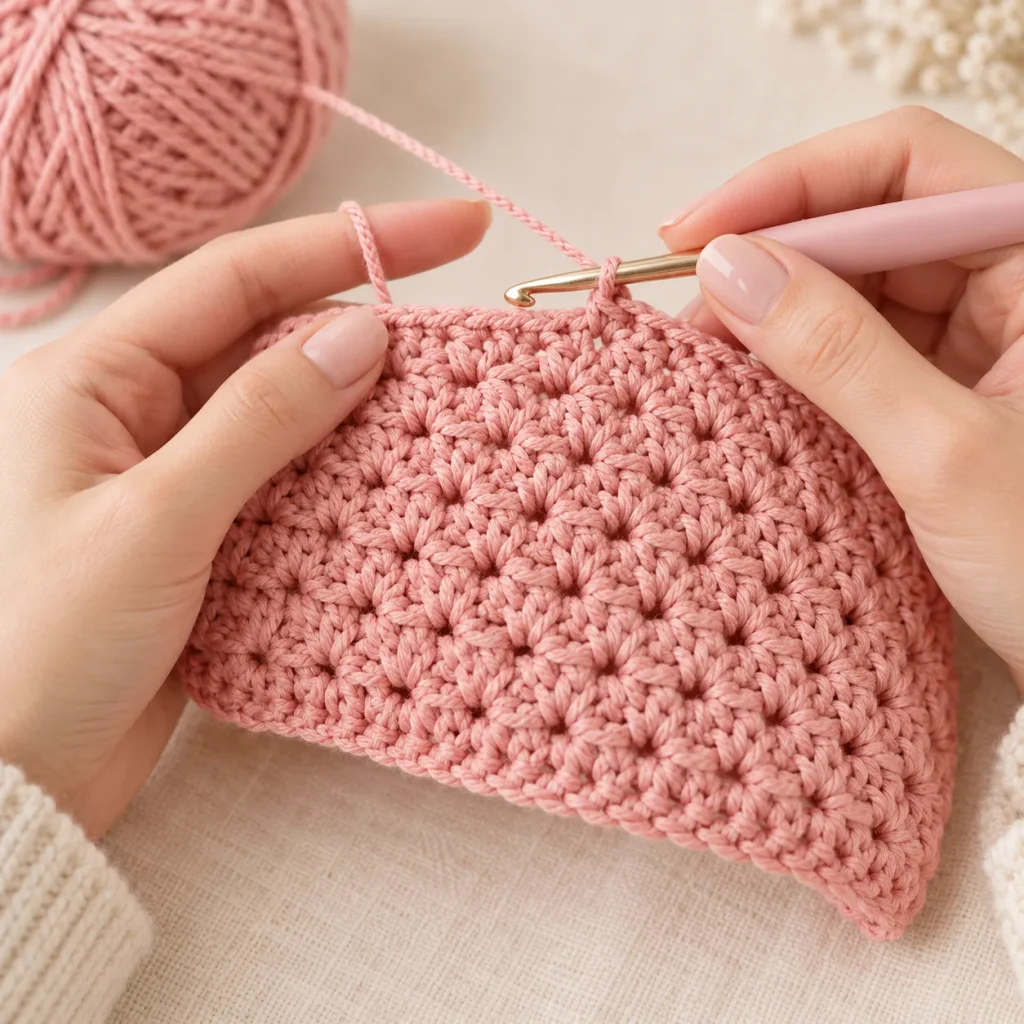
Piece 1: Textured Bonnet Body
Using dusty pink and the 3.5 mm hook:
Foundation
Ch 56
Row 1
Sc in the second chain from the hook and across.
You should have:
55 sc
Row 2
Ch 1 and turn.
Work:
sc in first stitch, then (dc in next stitch, sc in next stitch) ×27
You should still have:
55 stitches
Row 3
Ch 1 and turn.
Work:
dc in first stitch, then (sc in next stitch, dc in next stitch) ×27
Again, keep:
55 stitches
Rows 4–21
Repeat Rows 2 and 3 nine more times.
You will finish with 21 rows total: one foundation sc row and 20 textured rows.
Fasten off, leaving a long sewing tail if possible.
I really like this stitch pattern because the alternating sc and dc give the fabric a gentle texture without making it too bulky for a baby bonnet.
Piece 2: Back Seam and Shaping
Mark the middle stitch of the foundation edge:
stitch 28
Fold the rectangle with the right sides together.
Match the first and last stitches of each row.
Along the foundation edge, sew:
- the first 27 stitches
- to the final 27 stitches
Work toward the marked center fold.
The center stitch stays right at the fold.
Keep the seam flexible and gently curve the final 1 cm toward the fold to soften the upper back corner.
Turn the bonnet right side out.
Row 21 becomes the face-opening edge, and the exposed row ends form the lower nape edge.
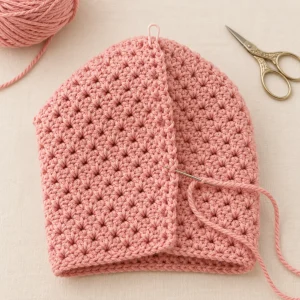
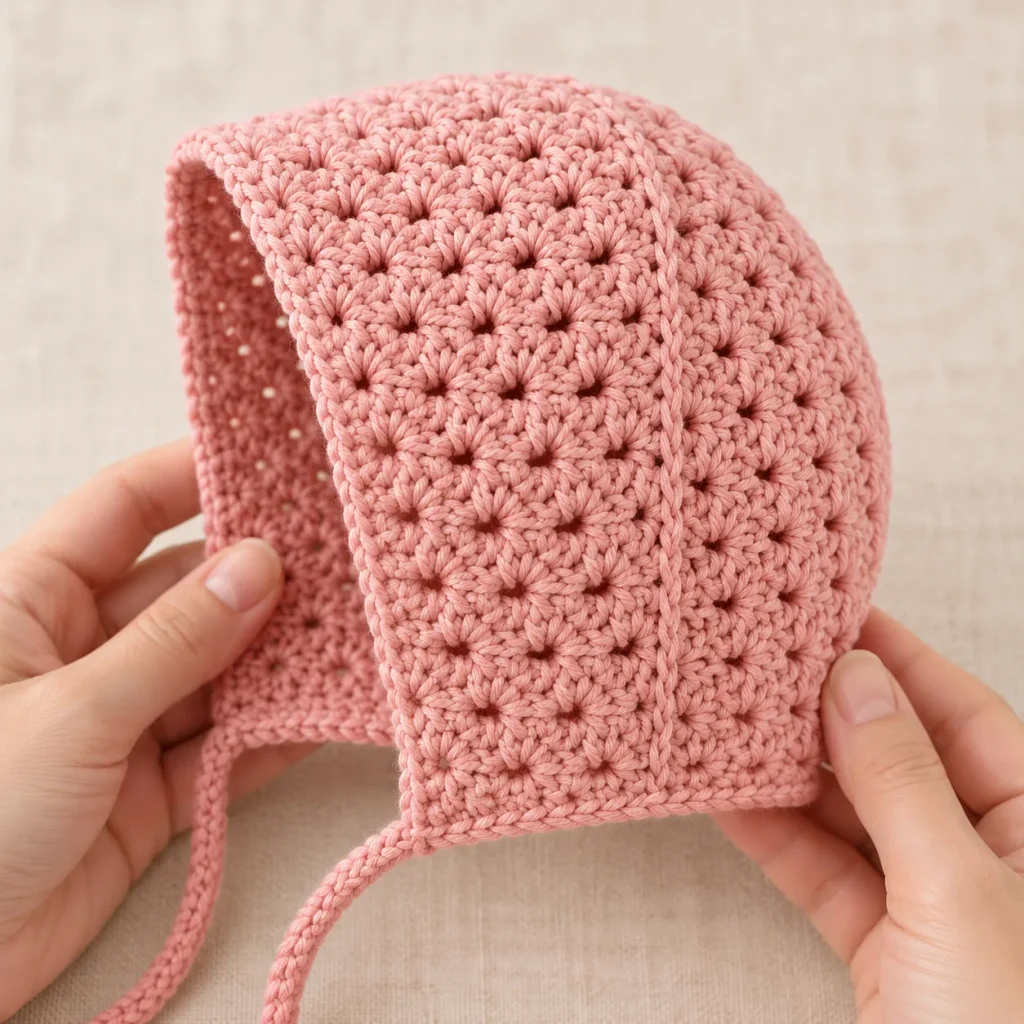
Piece 3: Cream Scalloped Face Edging
With cream and the 3.5 mm hook, join yarn at one lower front corner.
Edging Row 1
Ch 1.
Sc in every stitch across the face opening.
You should have:
55 sc
Edging Row 2
Ch 1 and turn.
Work 1 sc in the first stitch.
Then repeat:
skip 2, 7 dc in next stitch, skip 2, sc in next stitch
Repeat this sequence 9 times.
You should finish with:
- 9 shells
- 63 dc
- 10 sc
Fasten off.
The scallops should sit softly around the face opening without pulling the pink fabric inward.
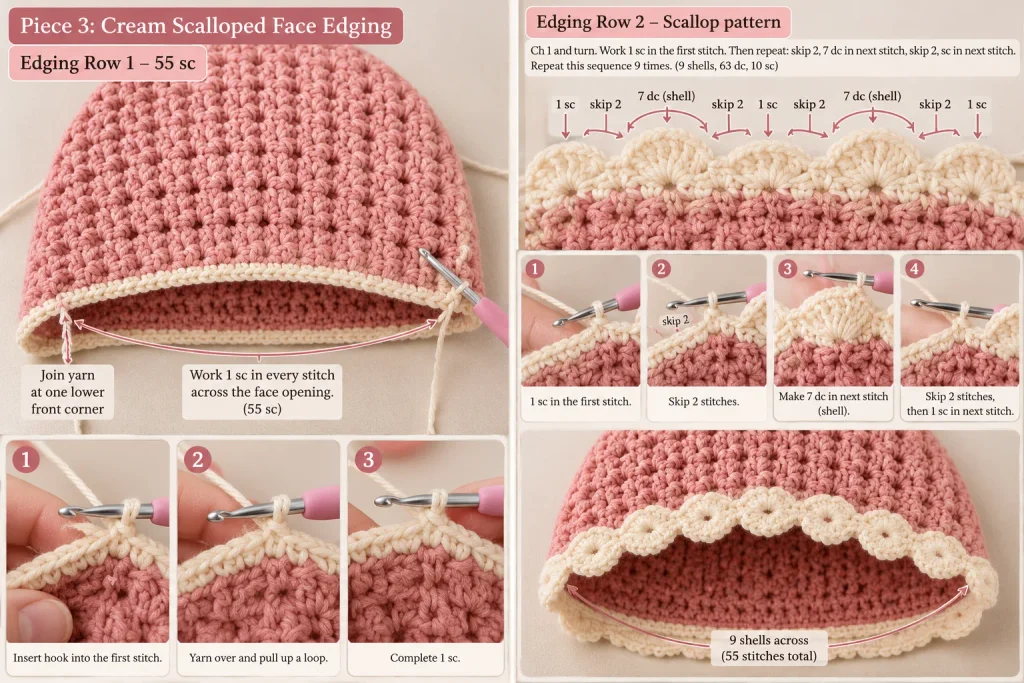
Piece 4: Cream Lower Edging
Join cream yarn at one lower front corner below the face edging.
Edging Row 1
Work:
- 1 sc into each of the 21 exposed row ends
- 1 sc at the back-seam junction
- 1 sc into each of the 21 row ends on the opposite side
You should have:
43 sc
Edging Row 2
Ch 1 and turn.
Work 1 sc in the first stitch.
Then repeat:
skip 2, 5 dc in next stitch, skip 2, sc in next stitch
Repeat 7 times.
You should finish with:
7 shells
Fasten off.
Secure both lower corners neatly to the face edging with a few sewing stitches.
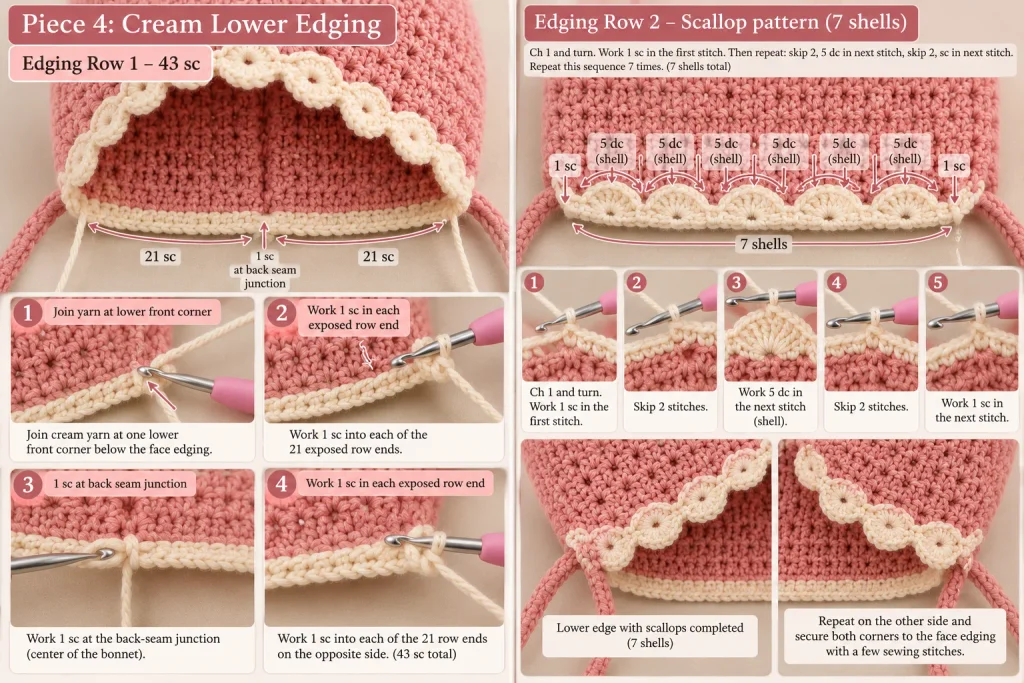
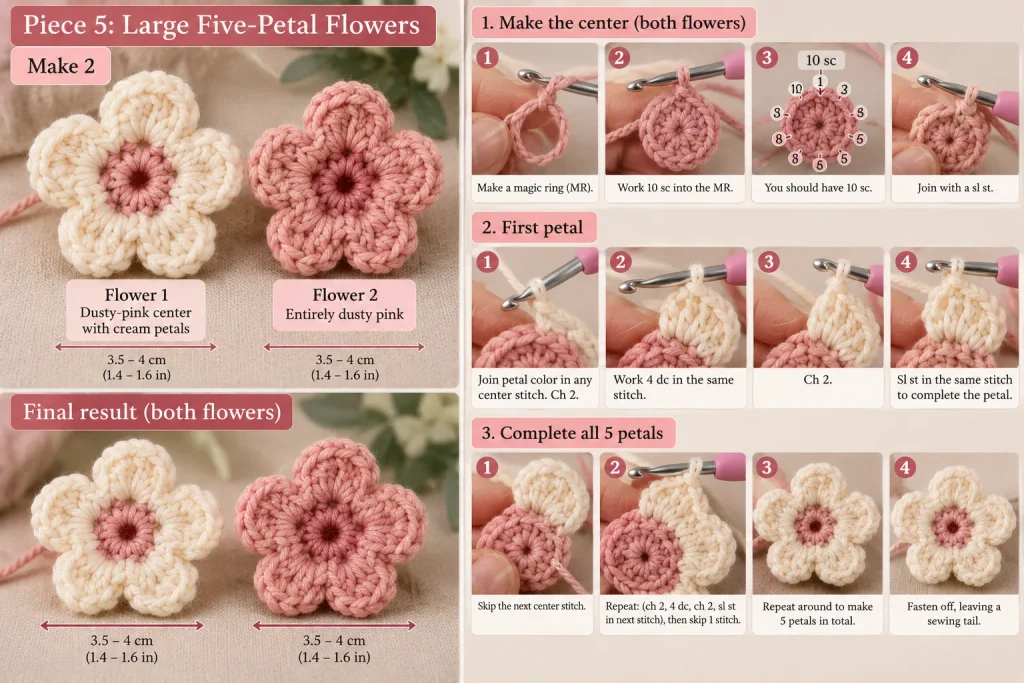
Piece 5: Large Five-Petal Flowers — Make 2
Use the 3 mm hook.
Make:
- 1 flower with a dusty-pink center and cream petals
- 1 flower entirely in dusty pink
Each flower should measure approximately 3.5–4 cm across.
Center
Make a magic ring.
Work:
10 sc into MR
Join with a sl st.
Petals
Join your petal color in any center stitch.
In the same stitch work:
ch 2, 4 dc, ch 2, sl st
Skip the next center stitch.
Repeat this process around until you have 5 petals.
Fasten off, leaving a sewing tail.
Piece 6: Green Leaves — Make 5
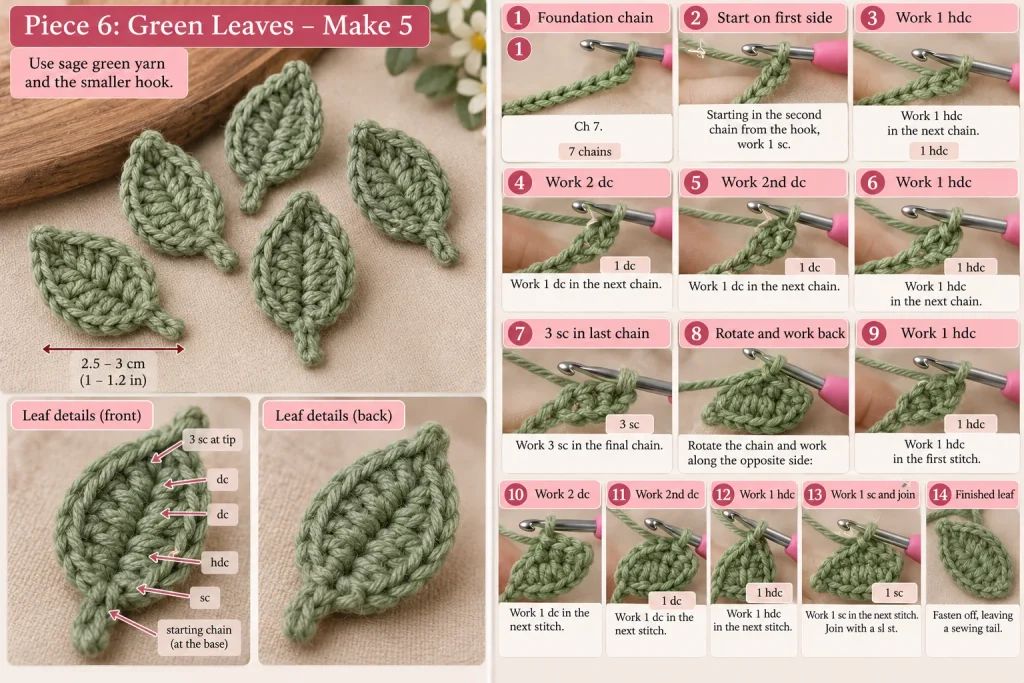
With sage green and the smaller hook:
Ch 7
Starting in the second chain from the hook, work:
- sc
- hdc
- dc
- dc
- hdc
- 3 sc in the final chain
Rotate the chain and work along the opposite side:
- hdc
- dc
- dc
- hdc
- sc
Join with a sl st.
Fasten off, leaving a sewing tail.
Each leaf should measure approximately 2.5–3 cm long.
Piece 7: Pink Ties — Make 2
Using dusty pink and the 3 mm hook:
Ch 45
Starting in the second chain from the hook, sl st in every chain across.
You should have:
44 sl st
Each finished tie should measure approximately:
18–20 cm
Adjust the starting chain slightly if needed so both ties finish at the same length.
Piece 8: Small Cream Tie-End Flowers — Make 2
With cream:
Make a magic ring and work:
5 sc into MR
Join.
In each stitch work:
sl st, ch 2, hdc, ch 2, sl st
Repeat around to make 5 tiny petals.
Fasten off, leaving a sewing tail.
Each flower should measure approximately 1.5–2 cm across.
Assembly and Finishing
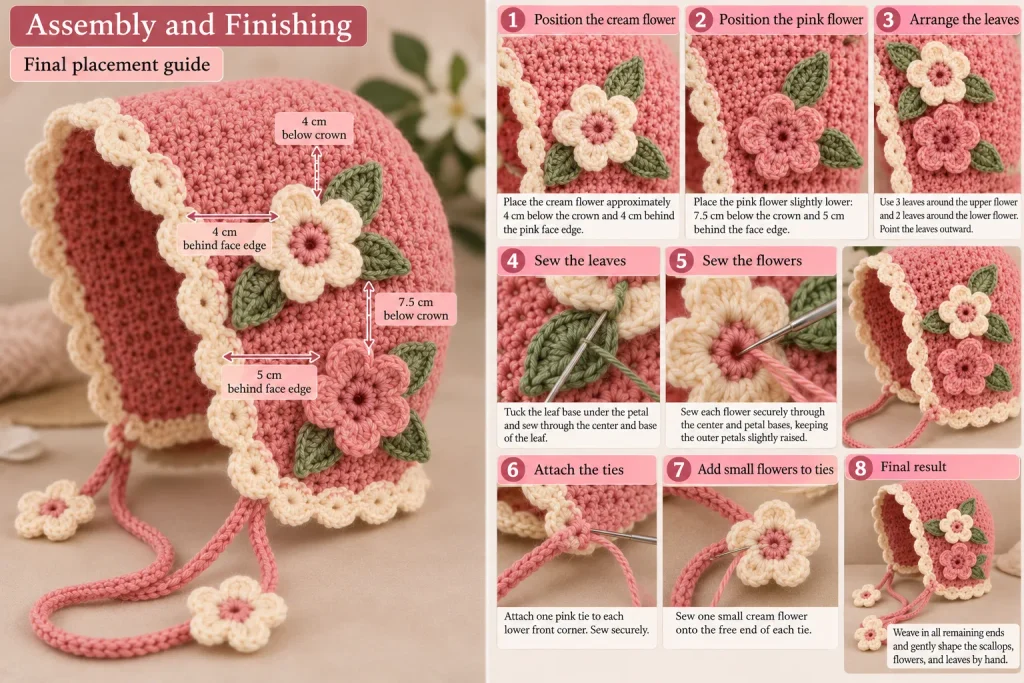
Place the bonnet with the decorated side facing up.
Position the cream flower approximately:
- 4 cm below the crown
- 4 cm behind the pink face edge
Place the pink flower slightly lower:
- 7.5 cm below the crown
- 5 cm behind the face edge
Arrange 3 leaves around the upper flower and 2 around the lower flower.
Tuck the leaf bases underneath the petals and point them outward.
Sew the leaves through their centers and bases. Sew the flowers securely through the centers and petal bases while leaving the outer petals slightly raised.
Attach one pink tie to each lower front corner.
Sew one small cream flower onto the free end of each tie.
Weave in all remaining ends and gently shape the scallops, flowers, and leaves by hand.
Final Fit and Safety Check
Before using the bonnet, check that:
- the height is about 14 cm
- the back-to-front depth is about 14.5 cm
- the face opening stays clear of the baby’s eyes
- the nape feels comfortable
- both ties are securely attached
- all flowers and leaves are firmly sewn in place
Because this bonnet has ties, use it only with direct adult supervision, remove it for sleep, and inspect the ties and appliqués before each use.
Final Thoughts
This is such a sweet little project if you enjoy crochet pieces that look detailed without needing complicated construction.
The textured pink body gives the bonnet a soft handmade feel, while the cream scallops make the face opening look delicate and finished. The flower cluster and tiny flower-tipped ties are what really give it that special vintage-inspired look.
Take your time with the gauge, the back seam, and the flower placement. Those three things make the biggest difference in the finished shape.
Once everything is sewn in place and the scallops are gently shaped, you end up with a beautiful little bonnet that would make a lovely baby-shower gift, newborn-photo accessory, or keepsake crochet piece.